
During summer months when fruits are very abundant, I often make big batches of jams and go through the canning process for putting them on the shelf for months later, if not a year or two later. It is quite a laborious process, I will admit, to take it from big batch production to shelved jars of confiture, several kilos at a time, all stocked and labeled in varied sized jars. Another way to enjoy confiture is to make small batches for immediate consumption. It is both fast and easy & you can enjoy the fruits of your labor immediately (no pun intended!). It is also the perfect way to use extra fruit that might not be as beautiful as it once was (ie, don’t want to serve them as is), but that is still juicy and delicious. Many recipes use a ratio of 1 to 1/2 of fruit to sugar, meaning that for every 1000 grams of fruit, you add 500 grams of sugar to the pot. I have never followed these recipes! Instead, I prefer more of a 1to 1/3 ratio. It uses less sugar, but I find that it is still plenty sweet. Using less sugar, however, means that it should not be stocked as long on a shelf because sugar acts as a preservative, and the less there is, the less time you can store it. I have never had a problem with having confiture spoil on me because it is used rather quickly at Château Ladausse. In this recipe, tart cherries add a nice acidic taste along with sweet cherries and raspberries. Enjoy!
Ingredients – for 1 small to medium size jar
400g mixed red fruit (tart and sweet cherries & raspberries)
130g sugar
Splash of lemon juice (optional)
Instructions:
- Clean & pit cherries; add to a pan. Add raspberries. I like to use about 2/3 cherries and 1/3 raspberries, but when other fruit are also available, such as red currants or blackberries, these are nice to add, too.
- Weigh sugar into same pan at a ratio of 33% sugar for every 1 kg of fruit. If you follow the recipe specifically, it is 400g of fruit + 130g sugar, but if your fruit weights vary, please adjust the sugar quantity accordingly.
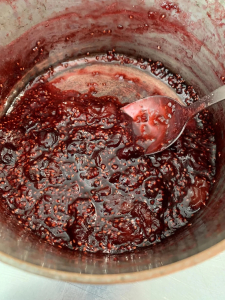
- Heat to boil and let gently simmer about 20 minutes or until it starts to meld together and thicken slightly. Taste and see if the flavour is great. If it’s a little dull, flat or not “zinging”, then it needs a pinch or two of sugar to brighten it up. During the first 20 minutes, keep an eye on it, giving a stir from time to time. Gently boil another 10 minutes or so, but pay careful attention at this point, stirring almost the entire time. It is done when it has thickened and the bubble are somewhat “heavy”. If it looks like it will start to burn on the bottom of the pan, then you’ve likely cooked it too long – remove immediately from heat (and immediately immerse the pan bottom in ice cold water, or just cold water, but do this quickly!). You want to stop the cooking just before that stage because it continues to cook after it is removed from the burner and it should thicken as it cools. (If done properly, you don’t need to quickly cold shock the pan but that can help avert overly cooked confiture in a pinch.)
- Once cool, it should be somewhat loose but never pourable from a spoon like a liquid would. If it is too liquid, put it back on the stove for a few minutes until you get to the desired consistency. When done correctly, you can spread it on a piece of toast with the back of a spoon.
Note: There will be some raspberry seeds in the finished confiture which don’t bother me when raspberries are the minority fruit. If you don’t like seeds, then perhaps this is not the recipe for you! You could strain them out in step 1 (after mixing them first in a mini food processor and passing through a sieve), but you will lose weight in the process, and the seeds do help thicken the confiture! Based on various raspberry varieties, the seeds can be more or less of a problem. The raspberries that we grow in the north garden at Château Ladausse do not produce offensive seeds – they are little and just fine to be left in the confiture. Use your own judgment! If you can make confiture with the seeds, this should only be a 30-40 minute process which will keep it in the “love to do” category, and not turn it into a major headache of a project!
Store in the fridge and use within a week or so.